photoshop做放射光線文字
時間:2024-02-03 11:15作者:下載吧人氣:27
作者小魚 出處:UCD博客
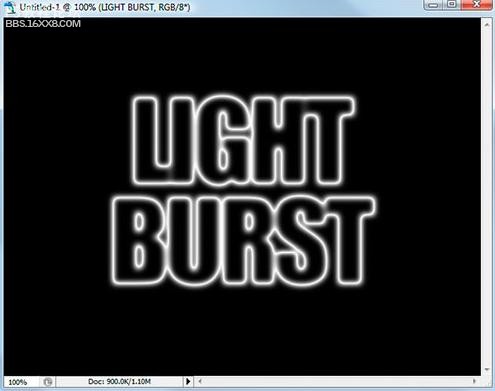
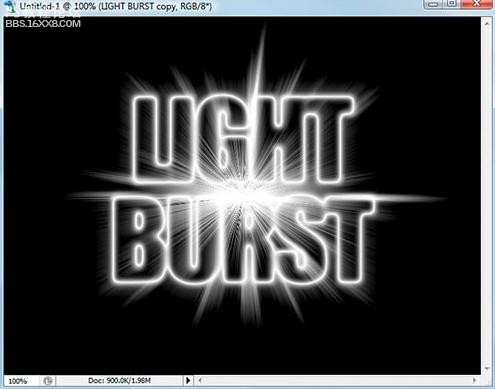
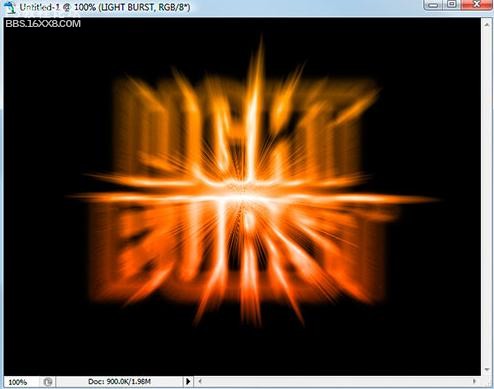
先看下效果!

以下是詳細的photoshop教程步驟:[size=2] [/size]
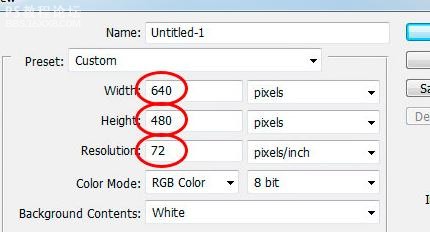
[size=2]第1步:新建文件。
[/size]
[size=2]
[/size]
[font=宋體][size=10.5pt]第[/size][/font][size=10.5pt]2[/size][font=宋體][size=10.5pt]步:添加文字
[/size][/font]

[font=宋體][size=10.5pt]第[/size][/font][size=10.5pt]3[/size][font=宋體][size=10.5pt]步:調整文字大小
[/size][/font]
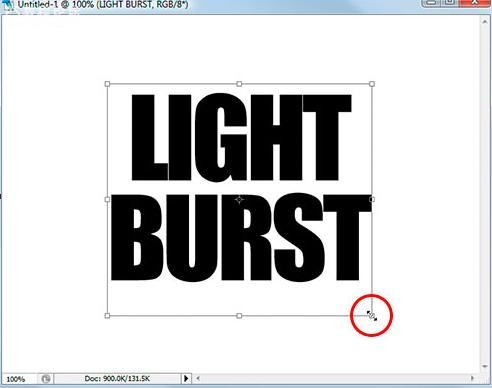
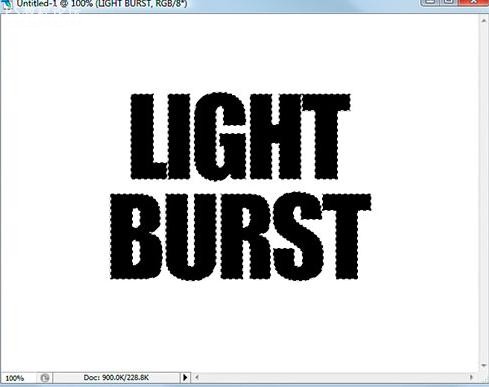
[font=宋體][size=10.5pt]第[/size][/font][size=10.5pt]4[/size][font=宋體][size=10.5pt]步:文字柵格化。
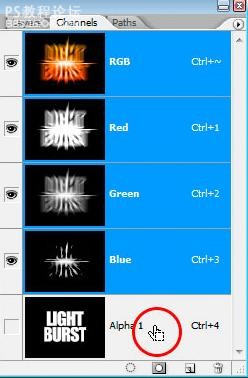
[font=宋體][size=10.5pt][font=宋體][size=10.5pt]第[/size][/font][size=10.5pt]5[/size][font=宋體][size=10.5pt]步:選擇你的文字 [/size][/font]按[/size][/font][size=10.5pt]Ctrl -[/size][font=宋體][size=10.5pt]單擊文字圖層[/size][/font][size=10.5pt]” [/size][font=宋體][size=10.5pt]您的文字現在有一個選擇區(漸入選取)
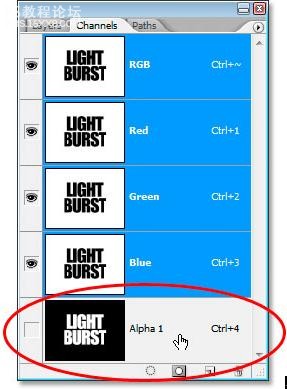
[/size][/font][/size][/font][size=3] 選擇 儲存選取(保存選取)
[/size]
[font=宋體][size=10.5pt]切換到通道會多了一層“[/size][/font][size=10.5pt]Alpha 1[/size][font=宋體][size=10.5pt]”
[/size][/font]
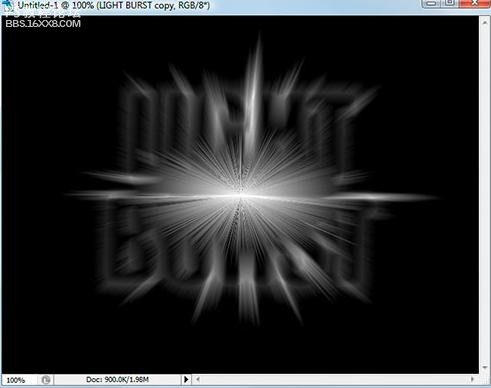
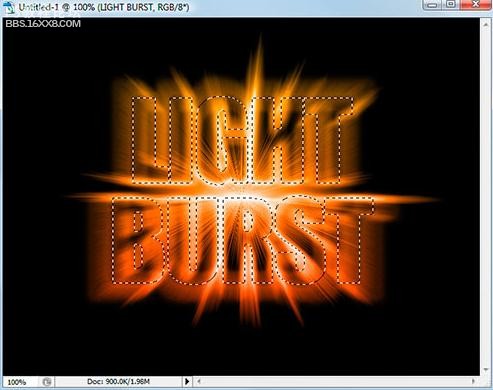
[font=宋體][size=10.5pt]步驟[/size][/font][size=10.5pt]6 [/size][font=宋體][size=10.5pt]:選擇文字層
[/size][/font]
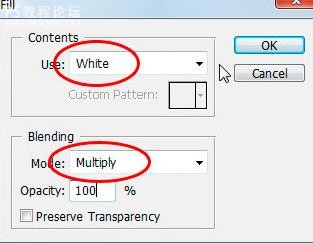
[size=10.5pt]打開“[/size][font=宋體][size=10.5pt]填充[/size][/font][size=10.5pt]”[/size][font=宋體][size=10.5pt]對話框[/size][/font][size=10.5pt]“[/size]
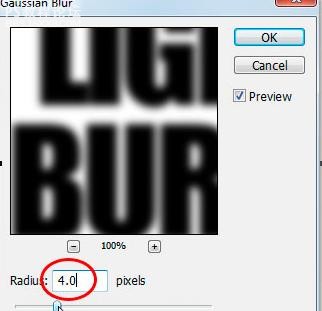
[size=10.5pt][font=宋體][size=10.5pt]第[/size][/font][size=10.5pt]7[/size][font=宋體][size=10.5pt]步:應用高斯模糊[/size][/font]
[font=宋體][size=10.5pt]輸入值[/size][/font][size=10.5pt]4[/size][font=宋體][size=10.5pt]像素(如圖)
[/size][/font][/size]
確認!
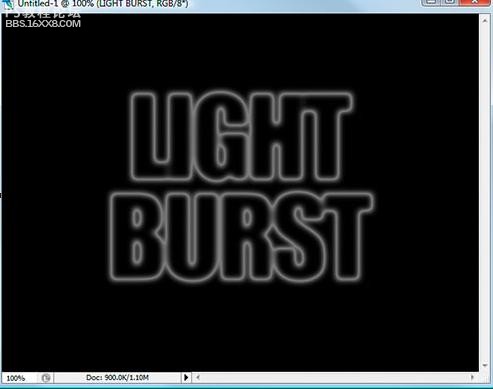
[font=宋體][size=10.5pt]第[/size][/font][size=10.5pt]8[/size][font=宋體][size=10.5pt]步:選擇風格化[/size][/font]
[font=宋體][size=10.5pt],然后選擇曝光[/size][/font]
[font=宋體][size=10.5pt]。如圖顯示[/size][/font]
[font=宋體][size=10.5pt]步驟[/size][/font][size=10.5pt]9 [/size][font=宋體][size=10.5pt]:使用鍵盤快捷按[/size][/font][size=10.5pt]Ctrl +L
[/size]
[font=宋體][size=10.5pt]步驟[/size][/font][size=10.5pt]10 [/size][font=宋體][size=10.5pt]:復制文字層快捷按[/size][/font][size=10.5pt]Ctrl + J[/size]
[size=10.5pt][font=宋體][size=10.5pt]步驟[/size][/font][size=10.5pt]11 [/size][font=宋體][size=10.5pt]:對復制的新文字層 用[/size][/font][size=10.5pt]“[/size][font=宋體][size=10.5pt]極坐標[/size][/font][size=10.5pt]”
[/size][/size]
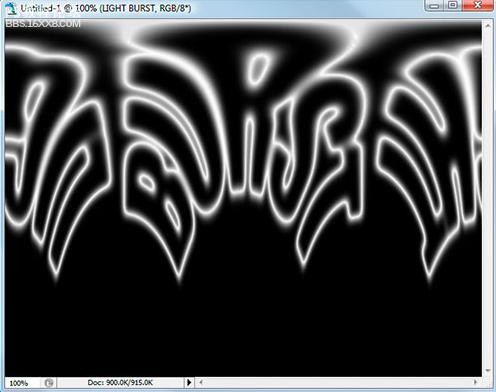
[font=宋體][size=10.5pt]步驟[/size][/font][size=10.5pt]12 [/size][font=宋體][size=10.5pt]:旋轉畫布 [/size][/font][font=宋體][size=10.5pt]順時針[size=10.5pt]90[/size][font=宋體][size=10.5pt]度
[/size][/font][/size][/font]
[font=宋體][size=10.5pt][font=宋體][size=10.5pt]步驟[/size][/font][size=10.5pt]13 [/size][font=宋體][size=10.5pt]:[/size][/font]
[font=宋體][size=10.5pt]快捷按[/size][/font][size=10.5pt]Ctrl +i[/size][font=宋體][size=10.5pt],黑色變成白色,白色變成黑色:
[/size][/font][/size][/font]
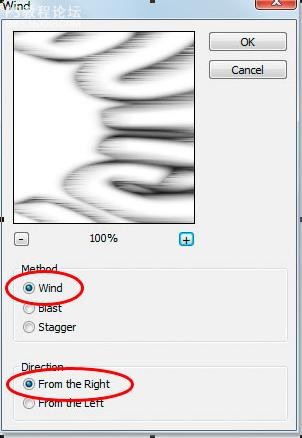
[font=宋體][size=10.5pt]步驟[/size][/font][size=10.5pt]14 [/size][font=宋體][size=10.5pt]:使用[/size][/font][size=10.5pt] “[/size][font=宋體][size=10.5pt]風[/size][/font][size=10.5pt]”[/size][font=宋體][size=10.5pt]三次
[/size][/font]
[font=宋體][size=10.5pt]
[font=宋體][size=10.5pt]第[/size][/font][size=10.5pt]15[/size][font=宋體][size=10.5pt]步:再次按[/size][/font][size=10.5pt] Ctrl +i[/size][font=宋體][size=10.5pt]顛倒[/size][/font][/size][/font]
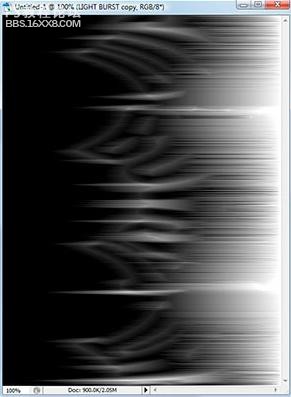
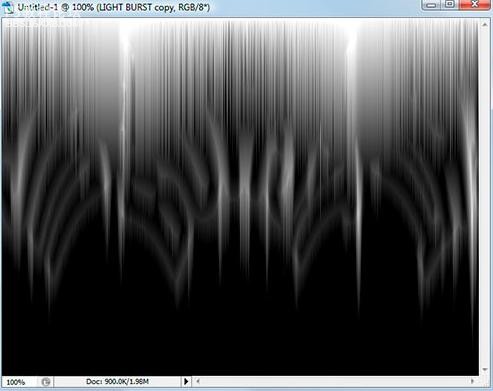
[font=宋體][size=10.5pt] 按鍵盤快捷鍵按[/size][/font][size=10.5pt]Ctrl + f[/size][font=宋體][size=10.5pt]三次 出現如下效果[/size][/font]

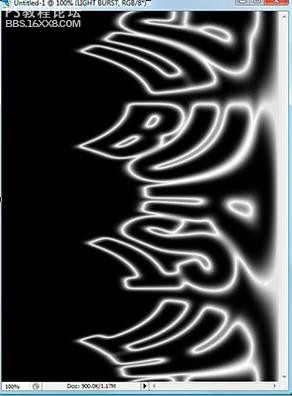
[font=宋體][size=10.5pt]第[/size][/font][size=10.5pt]17[/size][font=宋體][size=10.5pt]步:[/size][/font]
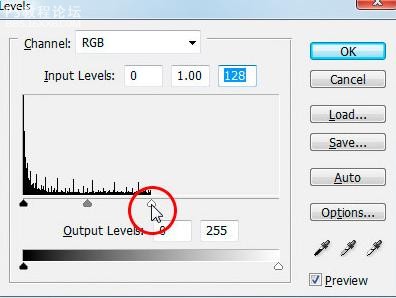
[font=宋體][size=10.5pt]按[/size][/font][size=10.5pt] SHIFT + CTRL +L[/size][font=宋體][size=10.5pt]用自動色階命令
[/size][/font]
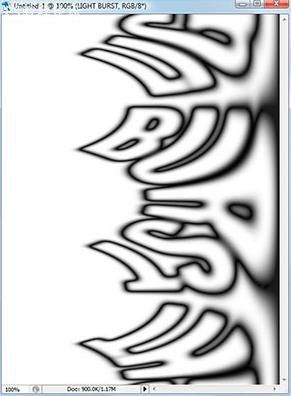
[size=2]步驟18 :旋轉畫布逆時針90度
[/size]
[size=2]
[/size]
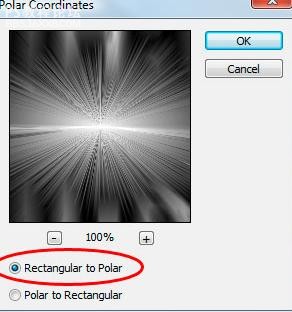
[font=宋體][size=10.5pt]步驟[/size][/font][size=10.5pt]19 [/size][font=宋體][size=10.5pt]:用[/size][/font][size=10.5pt]“[/size][font=宋體][size=10.5pt]極坐標[/size][/font][size=10.5pt]”[/size][font=宋體][size=10.5pt]濾鏡再次
[/size][/font]
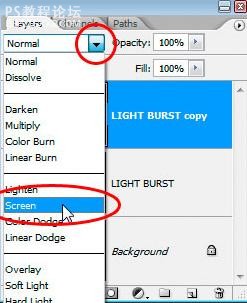
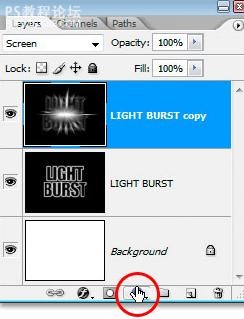
[size=3][font=宋體]步驟[/font][font=Times New Roman]20 [/font][font=宋體]:設置圖層混合模式
[/font][/size]
[size=3][font=宋體]步驟[/font][font=Times New Roman]21 [/font][font=宋體]:應用漸變填充層[/font][font=Times New Roman]
[/font][/size]
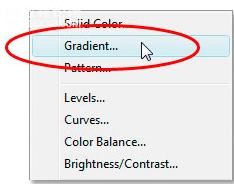
[font=宋體][size=10.5pt]在漸變填充對話框彈出,設置[/size][/font]
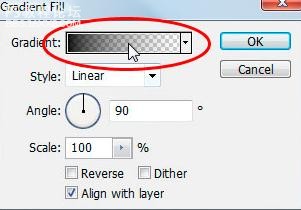
[font=宋體][size=10.5pt]然后設置漸變顏色,我已經設定顏色為紅色,橙色
[/size][/font]

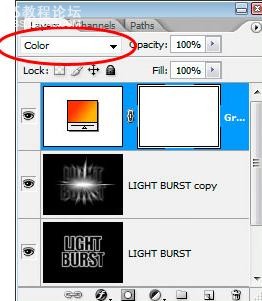
[font=宋體][size=10.5pt]步驟[/size][/font][size=10.5pt]22 [/size][font=宋體][size=10.5pt]:更改混合模式為[/size][/font][size=10.5pt]“[/size][font=宋體][size=10.5pt]顏色[/size][/font][size=10.5pt]”
[/size]
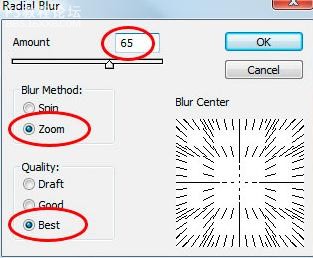
[font=宋體][size=10.5pt]步驟[/size][/font][size=10.5pt]23 [/size][font=宋體][size=10.5pt]:應用徑向模糊設置原始文字層
[/size][/font]

[font=宋體][size=10.5pt]步驟[/size][/font][size=10.5pt]24 [/size][font=宋體][size=10.5pt]:我們保存的“[/size][/font][size=10.5pt]Alpha 1[/size][font=宋體][size=10.5pt]”,載入選區[/size][/font]
[font=宋體][size=10.5pt]步驟[/size][/font][size=10.5pt]25 [/size][font=宋體][size=10.5pt]:填黑色[/size][/font]
[font=宋體][size=10.5pt]按[/size][/font][size=10.5pt] Ctrl + D[/size][font=宋體][size=10.5pt]刪除的選擇[/size][/font]

[font=宋體][size=3]【完】[/size][/font]
先看下效果!
以下是詳細的photoshop教程步驟:[size=2] [/size]
[size=2]第1步:新建文件。
[/size]
[size=2]
[/size]
[font=宋體][size=10.5pt]第[/size][/font][size=10.5pt]2[/size][font=宋體][size=10.5pt]步:添加文字
[/size][/font]
[font=宋體][size=10.5pt]第[/size][/font][size=10.5pt]3[/size][font=宋體][size=10.5pt]步:調整文字大小
[/size][/font]
[font=宋體][size=10.5pt]第[/size][/font][size=10.5pt]4[/size][font=宋體][size=10.5pt]步:文字柵格化。
[font=宋體][size=10.5pt][font=宋體][size=10.5pt]第[/size][/font][size=10.5pt]5[/size][font=宋體][size=10.5pt]步:選擇你的文字 [/size][/font]按[/size][/font][size=10.5pt]Ctrl -[/size][font=宋體][size=10.5pt]單擊文字圖層[/size][/font][size=10.5pt]” [/size][font=宋體][size=10.5pt]您的文字現在有一個選擇區(漸入選取)
[/size][/font][/size][/font][size=3] 選擇 儲存選取(保存選取)
[/size]
[font=宋體][size=10.5pt]切換到通道會多了一層“[/size][/font][size=10.5pt]Alpha 1[/size][font=宋體][size=10.5pt]”
[/size][/font]
[font=宋體][size=10.5pt]步驟[/size][/font][size=10.5pt]6 [/size][font=宋體][size=10.5pt]:選擇文字層
[/size][/font]
[size=10.5pt]打開“[/size][font=宋體][size=10.5pt]填充[/size][/font][size=10.5pt]”[/size][font=宋體][size=10.5pt]對話框[/size][/font][size=10.5pt]“[/size]
[size=10.5pt][font=宋體][size=10.5pt]第[/size][/font][size=10.5pt]7[/size][font=宋體][size=10.5pt]步:應用高斯模糊[/size][/font]
[font=宋體][size=10.5pt]輸入值[/size][/font][size=10.5pt]4[/size][font=宋體][size=10.5pt]像素(如圖)
[/size][/font][/size]
確認!
[font=宋體][size=10.5pt]第[/size][/font][size=10.5pt]8[/size][font=宋體][size=10.5pt]步:選擇風格化[/size][/font]
[font=宋體][size=10.5pt],然后選擇曝光[/size][/font]
[font=宋體][size=10.5pt]。如圖顯示[/size][/font]
[font=宋體][size=10.5pt]步驟[/size][/font][size=10.5pt]9 [/size][font=宋體][size=10.5pt]:使用鍵盤快捷按[/size][/font][size=10.5pt]Ctrl +L
[/size]
[font=宋體][size=10.5pt]步驟[/size][/font][size=10.5pt]10 [/size][font=宋體][size=10.5pt]:復制文字層快捷按[/size][/font][size=10.5pt]Ctrl + J[/size]
[size=10.5pt][font=宋體][size=10.5pt]步驟[/size][/font][size=10.5pt]11 [/size][font=宋體][size=10.5pt]:對復制的新文字層 用[/size][/font][size=10.5pt]“[/size][font=宋體][size=10.5pt]極坐標[/size][/font][size=10.5pt]”
[/size][/size]
[font=宋體][size=10.5pt]步驟[/size][/font][size=10.5pt]12 [/size][font=宋體][size=10.5pt]:旋轉畫布 [/size][/font][font=宋體][size=10.5pt]順時針[size=10.5pt]90[/size][font=宋體][size=10.5pt]度
[/size][/font][/size][/font]
[font=宋體][size=10.5pt][font=宋體][size=10.5pt]步驟[/size][/font][size=10.5pt]13 [/size][font=宋體][size=10.5pt]:[/size][/font]
[font=宋體][size=10.5pt]快捷按[/size][/font][size=10.5pt]Ctrl +i[/size][font=宋體][size=10.5pt],黑色變成白色,白色變成黑色:
[/size][/font][/size][/font]
[font=宋體][size=10.5pt]步驟[/size][/font][size=10.5pt]14 [/size][font=宋體][size=10.5pt]:使用[/size][/font][size=10.5pt] “[/size][font=宋體][size=10.5pt]風[/size][/font][size=10.5pt]”[/size][font=宋體][size=10.5pt]三次
[/size][/font]
[font=宋體][size=10.5pt]
[font=宋體][size=10.5pt]第[/size][/font][size=10.5pt]15[/size][font=宋體][size=10.5pt]步:再次按[/size][/font][size=10.5pt] Ctrl +i[/size][font=宋體][size=10.5pt]顛倒[/size][/font][/size][/font]
[font=宋體][size=10.5pt] 按鍵盤快捷鍵按[/size][/font][size=10.5pt]Ctrl + f[/size][font=宋體][size=10.5pt]三次 出現如下效果[/size][/font]
[font=宋體][size=10.5pt]第[/size][/font][size=10.5pt]17[/size][font=宋體][size=10.5pt]步:[/size][/font]
[font=宋體][size=10.5pt]按[/size][/font][size=10.5pt] SHIFT + CTRL +L[/size][font=宋體][size=10.5pt]用自動色階命令
[/size][/font]
[size=2]步驟18 :旋轉畫布逆時針90度
[/size]
[size=2]
[/size]
[font=宋體][size=10.5pt]步驟[/size][/font][size=10.5pt]19 [/size][font=宋體][size=10.5pt]:用[/size][/font][size=10.5pt]“[/size][font=宋體][size=10.5pt]極坐標[/size][/font][size=10.5pt]”[/size][font=宋體][size=10.5pt]濾鏡再次
[/size][/font]
[size=3][font=宋體]步驟[/font][font=Times New Roman]20 [/font][font=宋體]:設置圖層混合模式
[/font][/size]
[size=3][font=宋體]步驟[/font][font=Times New Roman]21 [/font][font=宋體]:應用漸變填充層[/font][font=Times New Roman]
[/font][/size]
[font=宋體][size=10.5pt]在漸變填充對話框彈出,設置[/size][/font]
[font=宋體][size=10.5pt]然后設置漸變顏色,我已經設定顏色為紅色,橙色
[/size][/font]
[font=宋體][size=10.5pt]步驟[/size][/font][size=10.5pt]22 [/size][font=宋體][size=10.5pt]:更改混合模式為[/size][/font][size=10.5pt]“[/size][font=宋體][size=10.5pt]顏色[/size][/font][size=10.5pt]”
[/size]
[font=宋體][size=10.5pt]步驟[/size][/font][size=10.5pt]23 [/size][font=宋體][size=10.5pt]:應用徑向模糊設置原始文字層
[/size][/font]
[font=宋體][size=10.5pt]步驟[/size][/font][size=10.5pt]24 [/size][font=宋體][size=10.5pt]:我們保存的“[/size][/font][size=10.5pt]Alpha 1[/size][font=宋體][size=10.5pt]”,載入選區[/size][/font]
[font=宋體][size=10.5pt]步驟[/size][/font][size=10.5pt]25 [/size][font=宋體][size=10.5pt]:填黑色[/size][/font]
[font=宋體][size=10.5pt]按[/size][/font][size=10.5pt] Ctrl + D[/size][font=宋體][size=10.5pt]刪除的選擇[/size][/font]
[font=宋體][size=3]【完】[/size][/font]
標簽文字,光線,放射,做,photoshop

網友評論