作者:情非得已 出處:ximumu
HI,我叫Alvaro Guzman,這是別樣wordpress模版的第二部分.在這節課里,將學到如何運用,XHML+CSS來建一個網頁.還會學到如何使用CSS來建一個wordpress模版.在學這一節課時,你最好有一些關于HTML和CSS的知識(可以在本站的CSS欄目找),還應該了解wordpress的功能和結構.
如果你是一個程序員,你必須有一定的PS基礎,圖層,切片,和了解一些wordpress的功能.無論如何,如果你是一個剛入門的webdesigner,我敢肯定你會覺得那些知識對你一定有作用.
Step 1 – Let’s begin
打開PSD文件.
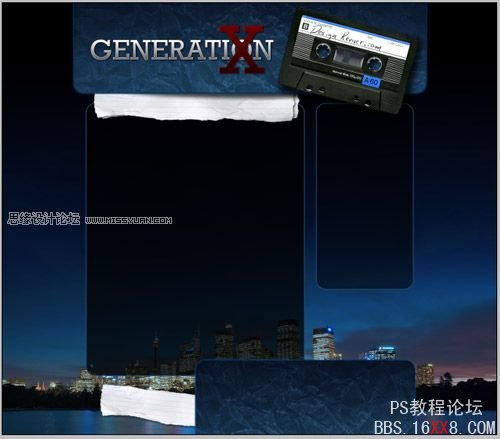
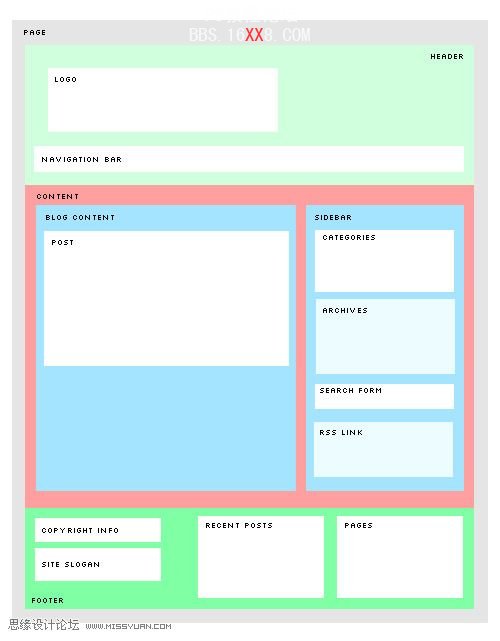
首先,隱藏所有圖層中的文本,鏈接,圖像.盡可能的顯示只有容器相關的圖層.(如圖),只顯示背景,頭部,導航,主體的容器,和頁腳.當然你還得有一個文件夾來存圖像.在這里我創建兩個子目錄,一個存放JPEG,另一個存PNG.
一個好的網頁開始于有一個良好的結構.先建好一個html文件,再給這個文件建一個CSS.最后你就可以把這些文件替換為wordpress模版.
Step 2 – 主要背景.
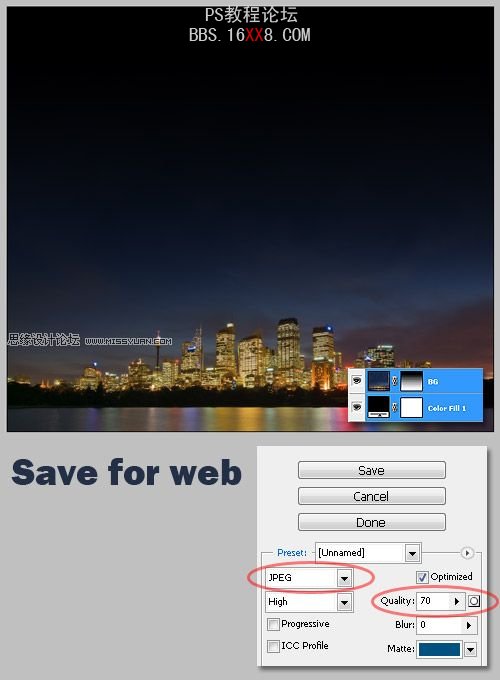
現在我們動手切割圖片,在PS中有一些方法可以切割圖片,但是我還是喜歡用切片工具,因為這個工具對于網頁比較好,但也不是都適合全部,具體問題要具體分析了.隱藏所有圖層,保留背景圖層和填充層.
按ctrl+alt+shift+S在彈出的對話框里選擇.在選項選擇.JPG格式,質量選70%.點保存最后把圖片保存在/images/jpgs 文件里.
Step3-切割網頁
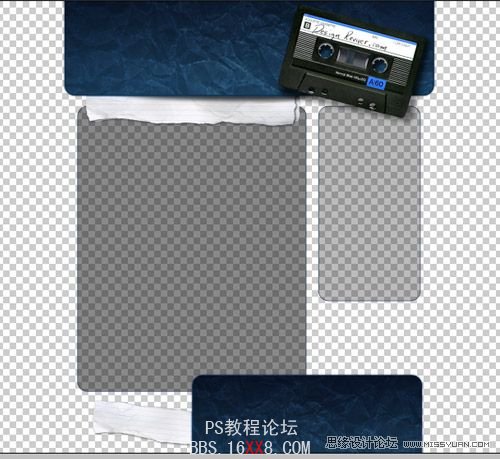
現在來做最有趣的事--切片!首先隱藏背景圖層,包括:圖片背景,背景,LOGO,最終結果如圖:
Step4-切割背景
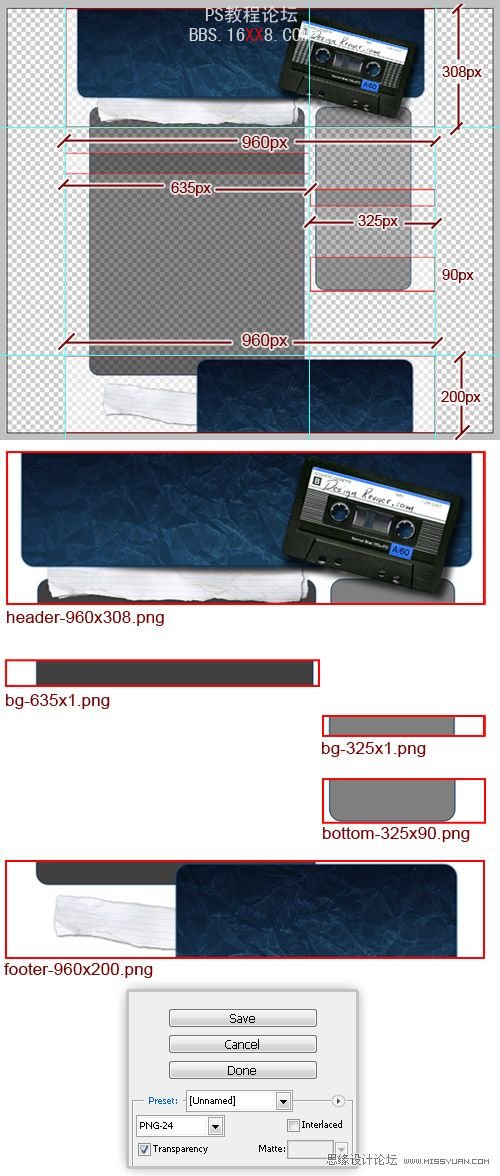
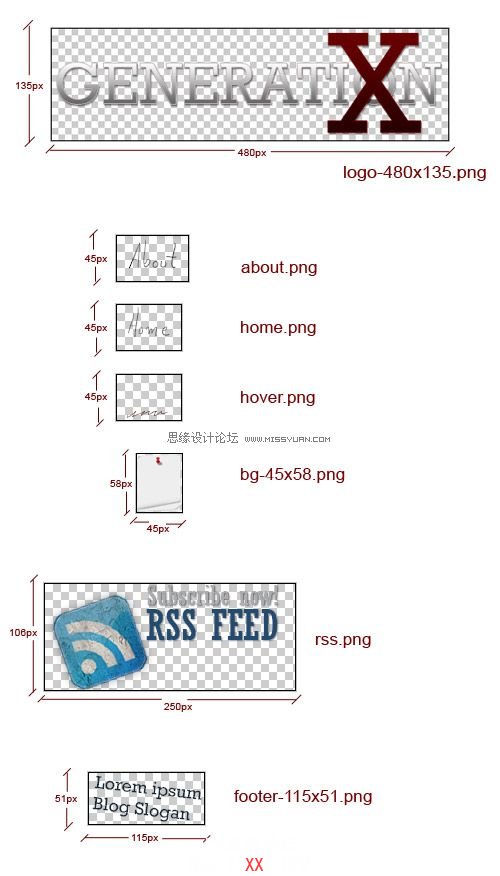
給每一個切片命一個名字(名字最好是有意義的).合并可以合并的圖片,并保留背景的透命度.我利用切片工具來切割頭部的圖片,切割主要背景(height:1px,在這里我是為了更明顯所以切割的比較大.)切割側邊背景(height:1px),繼續切割footer,和footer的背景.見下圖的測量長度,利用輔助線(CRTL+R)來精確的測量.保存圖片為PND-24位格式,最后保存在電腦里的PND文件夾里.
當圖片為PNG格式時,對于IE6是不好的支持,要升級到IE7,或者使用firefox.(如果你設計的目標是IE6,那格式最好用GIF或JGP)
Step-HTML框架
現在我們就開始編HTML框架,和CSS文件,做完之后就可以導入wordpress主題了.
頭部如下:
<head>
<title>GenerationX</title>
<link rel="stylesheet" href="style.css"type="text/css" media="screen" />
</head> |
在紙上建一個模型如圖:
繼續添加代碼--建一個DIV容器來裝所有的圖層.
<body><div id="page">
<!--Insert the layout here--> </div> <!--End of "page"--></body> |
頭部代碼:
<div id="header">
<div id="headerimg">
Page title
</div>
<div id="top_nav">
<ul>
<li>Home</li>
<li>About</li>
</ul>
</div>
</div> <!--End of "header"--> |
主內容層代碼:
| <div id="content"> <div class="blogcontent">
<div class="post">
<div class="post_title">
<h2><a href="#">Sample Post</a></h2> <small>November 2nd, 2008 | by admin | <a href="#">Lorem ipsum</a>| <a href="#">Category 1</a>| <a href="#">Uncategorized</a></small> </div> <!--End of "post title"-->
<!--Comments-->
<div class="postmetadata">
<a href="#">2</a> </div>
<br class="space" /> <div class="entry">
<p>
<a href="#"> <img class="alignleft" title="pic-02" src="images/jpgs/pic-01.jpg" border="0" alt=""/>
</a> But I must explain to you how all this mistaken idea of denouncing pleasure and praising pain was born and I will give you a complete account of the system, and expound the actual teachings of the great explorer of the truth, the master-builder of human. No one rejects, dislikes, or avoids <a href="#">pleasure</a> itself, because it is pleasure, but because those who do not know how to pursue pleasure rationally encounter consequences that are extremely painful.
</p> <a href="#" class="more-link">Read more »</a>
</div> <!--End of "entry"--> </div> <!--End of "post"-->
</div> <!--End of "blogcontent"-->
<div id="sidebar"> <ul>
<li class="categories">
<h2>Categories</h2>
<ul>
<li><a href="#">Lorem ipsum</a> (2)</li> <li><a href="#">Category 2</a> (1)</li>
<li><a href="#">Sample category 3</a> (15)</li>
</ul> </li> <li class="archives">
<h2>Archives</h2>
<ul>
<li><a href="#">November 2008</a> (2)</li>
</ul> </li>
<li class="linkcat">
<h2>Blogroll</h2>
<ul class='blogroll'>
<li><a href="http://wordpress.org/development/">Development Blog</a></li>
<li><a href="http://wordpress.org/extend/themes/">Themes</a></li>
<li><a href="http://planet.wordpress.org/">WordPress Planet</a></li>
</ul>
</li>
</ul> <!--End of sidebar's list-->
<div id="search">
<form>
<label class="hidden">Search for:</label>
<div>
<input type="text" value="" name="s" id="s" />
<input type="submit" id="searchsubmit" value="Search" />
</div>
</form>
</div> <!--End of "search"-->
</div> <!--End of "sidebar"-->
<div class="bottom_sidebar">
<a href="#">RSS feed</a>
</div>
</div> <!--End of "content"--> |
footer代碼:
| <br style="clear: both;" /> <div id="footer">
<div class="column1">
Author
<br />
<a href="#">Author's link</a><br />
<a href="#">License</a>
<div class="bottom">
Slogan
</div>
</div>
<div class="column2">
<h2>Recent posts</h2>
<ul>
<li><a href="#">Sample post</a></li>
<li><a href="#">Lorem Ipsum Dolor Sit Amet</a></li>
</ul>
</div> <div class="column2">
<h2>Pages</h2>
<ul>
<li><a href="#" title="About">About</a></li> <li><a href="#" title="About">About</a></li>
</ul>
</div>
</div> |
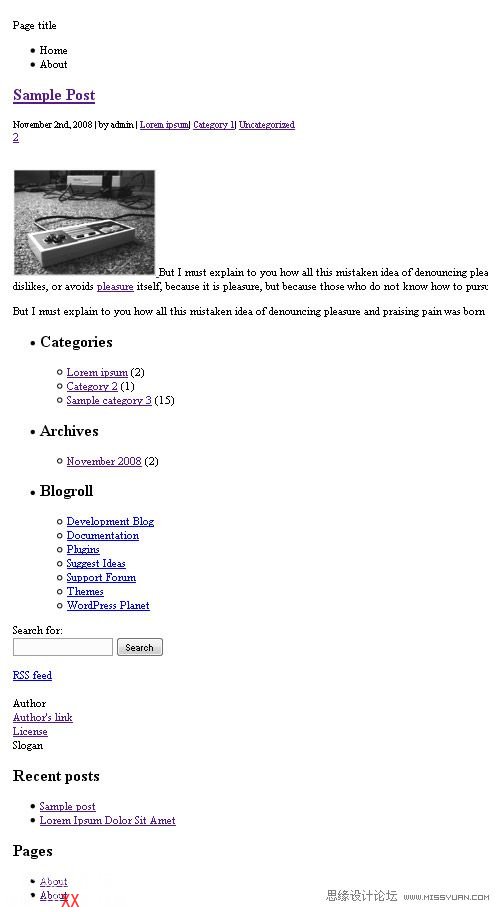
Step6--測試
當我們把代碼編好了,下一步要做是測試在瀏覽器中的效果,在這里我用的是firefox的最高版本.效果如圖:
Step7--內容和定位
新建一個CSS文件,首先要給每一個容器(DIV)做定位,這可能是一個比較難的工作,其實認真做就會感覺也很簡單,你只要確定它們的高度;寬度和浮動.
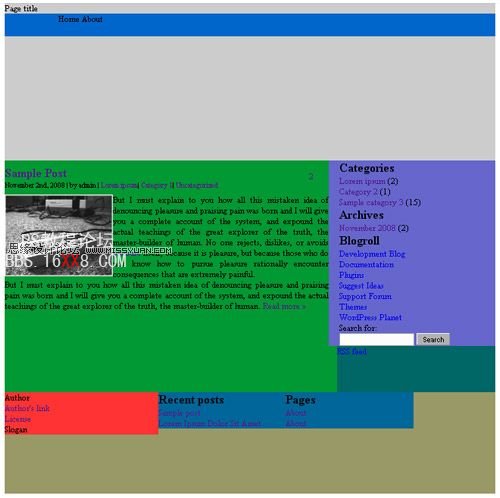
現在要給每一個容器定義CSS屬性,首先要明確類名和ID名,還要把相同的屬性的字符都找出來.請認真的檢查第五步里的HTML文件中的類名.別外說一點,在這里可以用明亮的背景顏色來顯示出每個容器的空間.(等到最后一步,可以把這些背景刪掉)而背景的圖片的尺寸可以從第四步中量出.
body
{
margin: 0px;
padding: 0px;
text-align: center;
} h1, h2, h3, ul, li, p, form
{
margin: 0px;
padding: 0px
} hr
{
display: none;
} a{
text-decoration:none;
} a:hover{
text-decoration:underline;
} .space
{
clear: both;
} #page
{
margin: 0px auto;
padding: 0;
width: 960px;
} #header
{
background:#CCCCCC;
height: 308px;
width: 960px;
text-align: center;
} #headerimg
{
margin: 0px;
text-align: left;
} #top_nav
{
background-color:#0066CC;
height: 45px;
padding-left: 105px;
text-align: left;
} #top_nav ul
{
list-style: none;
} #top_nav li
{
display: inline;
} #top_nav li a:hover
{
} #content
{
background: #009933;
float: left;
text-align: left;
} .blogcontent
{
float: left;
padding: 10px 0px;
width: 635px;
} .post
{
text-align: left;
} .post h2
{
padding: 0px;
} .post .post_title
{
float: left;
width: 90%;
} .post_title h2, a
{
padding: 0px;
margin: 0px;
} .post_title a
{
text-decoration: none;
} .post_title a:hover
{
} .post_title small
{
} .post_title small a
{
padding: 0px;
margin: 0px;
} .post .postmetadata
{
float: right;
height: 34px;
padding: 12px 5px;
width: 35px;
} .postmetadata a
{
text-decoration: none;
} .postmetadata span
{
padding-left:5px;
} .entry
{
} .entry a
{
padding: 0px;
margin: 0px;
} .entry a:hover
{
} .entry blockquote
{
border: 2px dashed #042748;
} .entry img
{
float: left;
} .entry ul
{
} .entry li
{ } .entry ol li
{
list-style: decimal;
} .entry p
{
text-align: justify;
padding: 0px;
} .entry span
{
} #sidebar
{
background-color:#6666CC;
float: left;
padding: 0px 20px;
text-align: left;
width: 285px;
} #sidebar ul
{
list-style: none;
margin: 0px;
} #sidebar li
{
margin: 0px;
} #sidebar li h2
{
margin: 0px;
} #sidebar ul ul
{
list-style: none;
margin: 0px;
} #sidebar ul ul li
{
margin: 0px;
} #sidebar ul ul li a
{
} #sidebar ul ul li a:hover
{
} .bottom_sidebar
{
background-color:#006666;
float: right;
height: 90px;
width: 310px;
} #search
{ } #search input
{ } #search #searchsubmit
{
background: #b1b1b1;
} #footer
{
background:#999966;
height: 200px;
text-align: left;
width: 960px;/*909*/
} #footer .column1
{
background:#FF3333;
float: left;
width: 300px;
} .column1 .bottom
{ } .column1 a
{
text-decoration: none;
} #footer .column2
{
background-color:#006699;
float: left;
width: 250px;
} .column2 h2
{
} .column2 ul
{
list-style: none;
} .column2 a
{
text-decoration: none;
} |
編好代碼后在你的瀏覽器中測試效果,在此之前加上必要的圖片,最終效果如下:
Step8--添加背景
好,現在開始添加背景圖像了,這時我們就用到前面那些切割出的的圖片了,因為城市背景是固定的,但是我們想要類似浮動的效果,該要怎么做呢,還記得第四步嗎?讓我們動手來做吧.
| body
{
background: #000000 url('./images/jpgs/bg-image.jpg') fixed no-repeat bottom center;
margin: 0px;
padding: 0px;
text-align: center;
} #header
{
background: url('./images/pngs/header-960x308.png') no-repeat top left;
height: 308px;
width: 960px;
text-align: center;
} #content
{
background: url('./images/pngs/bg-635x1.png') repeat-y top left;
float: left;
text-align: left;
} #sidebar
{
background: url('./images/pngs/bg-325x1.png') repeat-y top left;
float: left;
padding: 0px 20px;
text-align: left;
width: 285px;
} .bottom_sidebar
{
background: url('./images/pngs/bottom-325x90.png') no-repeat bottom center;
float: right;
padding: 0px 0px 0px 15px;
height: 90px;
text-align: left;
width: 310px;
} #footer
{
background: url('./images/pngs/footer-960x200.png') no-repeat top left;
height: 200px;
text-align: left;
width: 960px;
} |
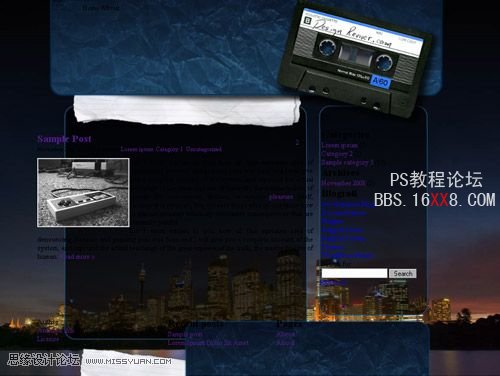
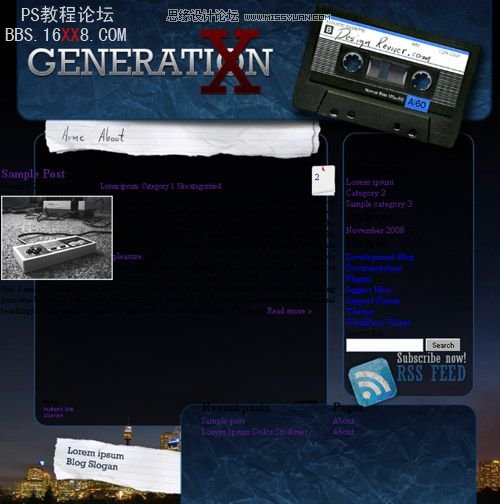
最終在瀏覽器效果如下:
Step9--添加前景圖片
添加LOGO,導航鏈接,評論背景,RSS圖標,等等.
| <div id="header">
<div id="headerimg">
<a href="#"><img alt="Generation X" border="0" src="./images/pngs/logo-480x135.png" /></a> </div>
<div id="top_nav">
<ul>
<li><a href="#"><img alt="Home" border="0" src="./images/pngs/home.png" /></a></li>
<li><a href="#"><img alt="About" border="0" src="./images/pngs/about.png" /></a></li> </ul>
</div>
</div>
<div class="bottom_sidebar"> <a href="#"><img alt="0" border="0" src="./images/pngs/rss.png" /></a> </div>
<div class="bottom"> <img alt="" border="0" src="./images/pngs/footer-115x51.png" /></div> |
為每個圖像添加應有的CSS屬性
| #headerimg
{
height: 185px;
margin: 0px;
padding: 55px 0px 0px 45px;
text-align: left;
} #top_nav
{
height: 45px;
padding-left: 105px;
text-align: left;
} #top_nav li a:hover
{
background: url('./images/pngs/hover.png') no-repeat bottom center;
} .bottom_sidebar
{
background: url('./images/pngs/bottom-325x90.png') no-repeat bottom center;
float: right;
padding: 0px 0px 0px 15px;
height: 90px;
text-align: left;
width: 310px;
} .post .postmetadata{ background: url('./images/pngs/bg-45x58.png') no-repeat top left; float: right; height: 34px; padding: 12px 10px; width: 25px;} #footer .column1
{
float: left;
font: normal 10px Arial;
padding: 0px 0px 0px 80px;
width: 300px;
} .column1 .bottom
{
padding: 50px 0px 0px 40px;
} |
在瀏覽器中的效果:
Step 10--添加文本樣式
我們越來越接近完成了,大家加油了,在這一步驟,給文本添加樣式.這一步要注意的地方是,把文本樣式添加在適合的地方,添加正確的padding 和margin的值.給例表添加CSS屬性.
| #sidebar li {margin: 0px; padding: 0px 0px 0px 20px; } |
COPY下面的代碼
| body
{
background: #000000 url('./images/jpgs/bg-image.jpg') fixed no-repeat bottom center;
color: #333;
margin: 0px;
padding: 0px;
text-align: center;
}
h1, h2, h3, ul, li, p, form
{
margin: 0px;
padding: 0px
}
hr
{
display: none;
}
a{
text-decoration:none;
}
a:hover{
text-decoration:underline;
}
.space
{
clear: both;
}
#page
{
margin: 0px auto;
padding: 0;
width: 960px;/*909*/
}
#header
{
background: url('./images/pngs/header-960x308.png') no-repeat top left;
height: 308px;
width: 960px;/*909*/
text-align: center;
}
#headerimg
{
height: 185px;
margin: 0px;
padding: 55px 0px 0px 45px;
text-align: left;
}
#top_nav
{
height: 45px;
padding-left: 105px;
text-align: left;
}
#top_nav ul
{
list-style: none;
} #top_nav li
{
display: inline;
} #top_nav li a:hover
{
background: url('./images/pngs/hover.png') no-repeat bottom center;
}
#top_sidebar
{
color: #fff;
font-weight: bold;
height: 10px;
padding-right: 155px;
text-align: right;
}
#content
{
background: url('./images/pngs/bg-635x1.png') repeat-y top left;
float: left;
text-align: left;
}
.blogcontent, .widecolumn
{
float: left;
padding: 10px 0px;
width: 635px;
}
.blogcontent form
{
color: #fff;
padding: 10px 50px 0px 90px;
} .blogcontent input
{
background-color: transparent;
border: 1px solid #214b73;
color: #fff;
} .blogcontent #searchsubmit
{
background: #b1b1b1;
color: #214b73;
font-weight: bold;
padding: 2px;
} .blogcontent h2
{
color: #fff;
font: bold 18px Georgia, Arial;
padding: 0px 50px 0px 90px;
} .blogcontent small a
{
font-size: 18px;
padding: 0px 50px 0px 90px;
}
.post
{
padding: 0px 50px 0px 90px;
text-align: left;
}
.post h2
{
color: #fff;
padding: 0px;
} .post .post_title
{
float: left;
width: 90%;
} .post_title h2, a
{
color: #b31414;
font: normal 24px Georgia, Arial;
padding: 0px;
margin: 0px;
} .post_title a
{
text-decoration: none;
} .post_title a:hover
{
color: #fff;
} .post_title small
{
color: #385673;
font: normal 12px Georgia, Arial;
} .post_title small a
{
color: #385673;
font: normal 12px Georgia, Arial;
padding: 0px;
margin: 0px;
} .post .postmetadata
{
background: url('./images/pngs/bg-45x58.png') no-repeat top left;
float: right;
height: 34px;
padding: 12px 10px;
width: 25px;
} .postmetadata a
{
color: #416fa3;
text-decoration: none;
} .postmetadata span
{
color: #416fa3;
font: normal 24px Georgia, Arial;
padding-left:5px;
}
.entry
{
color: #c3c3c3;
font: normal 12px Arial;
padding: 20px 0px;
}
.entry a
{
color: #385673;
font: normal 12px Georgia, Arial;
padding: 0px;
margin: 0px;
} .entry a:hover
{
color: #69c;
} .entry blockquote
{
border: 2px dashed #042748;
padding: 8px;
} .entry img
{
float: left;
padding: 0px 20px 0px 0px;
} .entry ul
{
padding-left: 20px;
} .entry li
{
list-style: url('./images/pngs/bull-list.png');
} .entry ol li
{
list-style: decimal;
} .entry p
{
text-align: justify;
padding: 0px;
} .entry span
{
color: #b31414;
}
#sidebar
{
background: url('./images/pngs/bg-325x1.png') repeat-y top left;
float: left;
padding: 0px 20px;
text-align: left;
width: 285px;
}
#sidebar ul
{
list-style: none;
margin: 0px;
padding: 5px 0px;
} #sidebar li
{
margin: 0px;
padding: 0px 0px 0px 20px;
} #sidebar li h2
{
color: #fff;
font: normal 18px Rockwell, Georgia, Arial;
margin: 0px;
padding: 10px 0px;
}
#sidebar ul ul
{
list-style: none;
margin: 0px;
} #sidebar ul ul li
{
margin: 0px;
padding: 0px 0px 0px 30px;
} #sidebar ul ul li a
{
color: #69c;
font: normal 12px Arial;
text-decoration: none;
} #sidebar ul ul li a:hover
{
color: #b31414;
}
.bottom_sidebar
{
background: url('./images/pngs/bottom-325x90.png') no-repeat bottom center;
float: right;
padding: 0px 0px 0px 15px;
height: 90px;
text-align: left;
width: 310px;
} #search
{
font: bold 12px Arial;
color: #fff;
padding: 0px 0px 15px 15px;
}
#search input
{
background-color: transparent;
border: 1px solid #214b73;
color: #fff;
}
#search #searchsubmit
{
background:#0B192C;
color: #FFFFFF;
font-weight: bold;
padding: 2px;
}
#footer
{
background: url('./images/pngs/footer-960x200.png') no-repeat top left;
color: #fff;
height: 200px;
text-align: left;
width: 960px;
}
#footer .column1
{
float: left;
font: normal 10px Arial;
padding: 0px 0px 0px 80px;
width: 300px;
} .column1 .bottom
{
padding: 50px 0px 0px 40px;
} .column1 a
{
color: #fff;
font: normal 12px Arial;
text-decoration: none;
} #footer .column2
{
float: left;
font: normal 12px Arial;
padding: 35px 0px 0px 0px;
width: 250px;
} .column2 h2
{
color: #457db9;
font: normal 20px Rockwell;
} .column2 ul
{
list-style: none;
} .column2 a
{
color: #fff;
font: normal 12px Arial;
text-decoration: none;
} |
做到這里一個個性的Wordpress模版就做好了.


網友評論